 |
 |
 |
 |
 |
 |
 |
 |
 |
 |
 |
 |
 |
 |
![]()
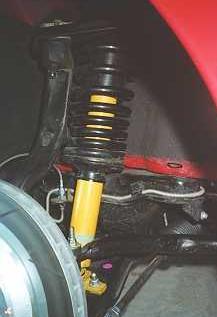
I've had quite a bit of suspension work done on the car to tighten up the car and fix up the handling. This is a convertible; if you've driven the stock coupe and the convertible, you can tell the difference in cornering and general responsiveness. With the mods below, I can now easily take turns at speed with the car remaining very flat, and the car has that "glued to the road" feel.

LG Motorsports
G2 Sway Bars, which help prevent body roll in turns. These are 32.5mm front, and 21.5mm rears (identical to the GM 1LE sway bars) - note that bigger is not always better with sway bars. All I can recommend regarding size is that you do some reading before choosing sway bars. They come in all sizes, and you probably won't want to buy and try each one! I had them painted black, and replaced all bushings and end links with Energy Suspension polyurethane parts, with zerk fittings.Installation: One of the easier mods to do, you just pull the end links and bushing brackets, and the sway bar comes off. Install the new bars, and you're done. The bushings need to be put on in the right direction: on the front sway bar, the bushing slits face forward, on the rear, the slits face the back of the car.
 I installed the Steve
Spohn LCA lowering kit, which is a pair of brackets that lower the rear of the trailing
arms. The trailing arms, in their best configuration, should be level, or pointing
slightly uphill (the fronts higher than the backs). After lowering a car, the arms will
typically be pointing in the wrong direction. These brackets weld around the stock
brackets, and provide two additional mounting points, one 1¾" lower, and one
2¾" lower. I installed the arms in the center point, which made them approximately
horizontal (see picture). For drag racing, I lower them to the lowest point.
I installed the Steve
Spohn LCA lowering kit, which is a pair of brackets that lower the rear of the trailing
arms. The trailing arms, in their best configuration, should be level, or pointing
slightly uphill (the fronts higher than the backs). After lowering a car, the arms will
typically be pointing in the wrong direction. These brackets weld around the stock
brackets, and provide two additional mounting points, one 1¾" lower, and one
2¾" lower. I installed the arms in the center point, which made them approximately
horizontal (see picture). For drag racing, I lower them to the lowest point.
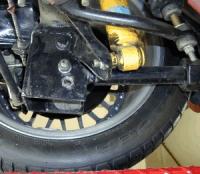 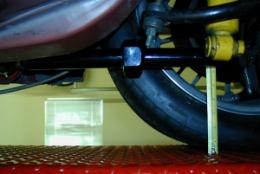 Here's an idea of the LCA being parallel to the floor. It's pretty much level now, which shows how bad it was before.
|
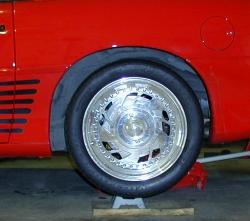
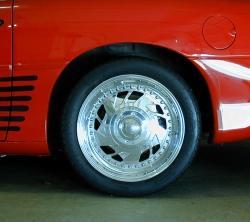
Here's an interesting predicament that showed up, after the LCA bracket kit. Take a look at the two pictures above. Notice in the left one, the wheel sits farther to the rear of the car? Turns out we welded the brackets just a bit (half an inch) too far forward, and when I put the LCA's back on, they pushed the axle to the rear. Argh. It wouldn't really be a problem, but the rear end cover is now hitting the upper Panhard rod pretty heavily. I decided to use a set of Spohn's adjustable LCA's, shortened the 1/2", to pull the axle back in. It worked like a charm, that's the picture on the right.
The pic above shows the G2 LCA above, and the Spohn adjustable one below. Note that the Spohn arm is not only adjustable, but one end is a heim joint. This should help prevent any suspension bind that the fixed polyurethane version might introduce. Installation: Fairly easy to do, though you might want a friend around. Pull only one trailing arm at a time, as the axle can move once you remove them. The only tricky part is getting the bolt holes lined up for the new arm, which will take some shoving on the axle one way or another. To adjust them, I first measured the forward clearance available on the driveshaft (don't want to drive it into the transmission!), then turned each LCA one turn at a time until the wheel was centered in the well. I kept them both the same length, but of course the normal use of these adjustable LCA's is to adjust your thrust angle, which means changing their lengths to ensure the rear axle is exactly perpendicular to the direction of the car. |
![]() BMR
double-adjustable Panhard rod. This rod originally came with polyurethane ends with zerk fittings. I
now use rod ends in this bar, for more stiff centering at the track. The Panhard rod is used
to hold your rear axle on center, between the wheel wells. Manufacturing
tolerances may have some cars' axles off-center from the factory, and
lowering a car will shift the axle about 0.1" to the left. Generally,
you wouldn't need an adjustable Panhard rod unless you were trying to fit
wheels with such close tolerance that you really wanted to get the axle
centered, or if it was just far enough off from the factory that you wanted
to correct it.
BMR
double-adjustable Panhard rod. This rod originally came with polyurethane ends with zerk fittings. I
now use rod ends in this bar, for more stiff centering at the track. The Panhard rod is used
to hold your rear axle on center, between the wheel wells. Manufacturing
tolerances may have some cars' axles off-center from the factory, and
lowering a car will shift the axle about 0.1" to the left. Generally,
you wouldn't need an adjustable Panhard rod unless you were trying to fit
wheels with such close tolerance that you really wanted to get the axle
centered, or if it was just far enough off from the factory that you wanted
to correct it.
 Installation:
The
Panhard rod is about the easiest mod you'll make. Jack up the rear end, and unbolt the
stock rod at each end. Use the same bolts to pop in the new one. Adjust by
turning the rod one way or the other until the wheels are equal distances
from the wheel wells. Use loctite on the jam nut when tightening down rod
ends.
Installation:
The
Panhard rod is about the easiest mod you'll make. Jack up the rear end, and unbolt the
stock rod at each end. Use the same bolts to pop in the new one. Adjust by
turning the rod one way or the other until the wheels are equal distances
from the wheel wells. Use loctite on the jam nut when tightening down rod
ends.
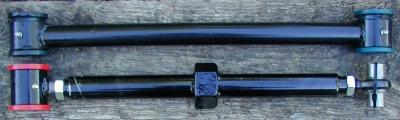
") I
originally a LG Motorsports torque arm, in an
effort to stabilize the rear end on hard launches. This was a slight left and right slide
during the launch. Frankly, I don't know if the torque arm solved it or not, the problem
was slight enough, and my launch not consistent enough, to really say. It's a cool part,
though! The stock part is shown on the left, the LG part on the right.
Frankly, though, I think there are better torque arms out there -
specifically ones that allow you to adjust the pinion angle, and those who's
front mount point is on the chassis rather than the transmission. I ended up
replacing the LG arm with a Spohn adjustable arm,
when the LG arm started hitting the tranny tunnel. I documented the upgrade
here....
I
originally a LG Motorsports torque arm, in an
effort to stabilize the rear end on hard launches. This was a slight left and right slide
during the launch. Frankly, I don't know if the torque arm solved it or not, the problem
was slight enough, and my launch not consistent enough, to really say. It's a cool part,
though! The stock part is shown on the left, the LG part on the right.
Frankly, though, I think there are better torque arms out there -
specifically ones that allow you to adjust the pinion angle, and those who's
front mount point is on the chassis rather than the transmission. I ended up
replacing the LG arm with a Spohn adjustable arm,
when the LG arm started hitting the tranny tunnel. I documented the upgrade
here....
Installation: The install was pretty simple, though others have had trouble. The key is not to allow the rear end to move after you remove the stock arm. Put the rear up on jacks, under the body, such that the suspension is extended. Pull the stock arm off, by removing the two large bolts through the differential, and the front bolts in the rubber mount. Completely remove the stock mount at the front, and replace with the LG spherical mount. Slide the new arm in place, and install the bolts through the rear.
If the bushing on your arm is stuck on, when you receive it, like mine was, this is what I did. I stood the thing up vertically, and sprayed some WD-40 on the bushing. I let it sit overnight, so the WD-40 could soak in. In the morning, I took a C clamp, and tightened it such that the bushing is pulled toward the end of the torque arm. One twist of the clamp, and the bushing popped loose. By the way, the LG arm weighs exactly the same as the stock arm, for some reason LG's web page states that it's 5lbs lighter...
I use Energy Suspension polyurethane bushings everywhere, they really firm up the ride. Make sure wherever possible to use greasable components (zerk fittings), as these bushings tend to squeak. Around 1998, ES came out with sway bar bushings with zerk fittings as well. The only complaint I have with ES products is that they use grade 5 hardware. I had an end link bolt get trashed because of this. I've replaced my bolts with equivalent grade 8 ones.
I've been greasing my suspension every 2500 miles or so, as soon as I hear any squeaking. Normally, that would bug me (say, if it were on my truck, which I'm never underneath), but I just do it when I'm under the car for some other reason.
Eibach Pro-Kit variable rate springs, part 3831.140, to stiffen the ride some more. These lower the car 1¼" both front and back. I do scrape speed bumps driveway entrances, etc, if I don't watch out, now, though this has been improved greatly with the exhaust hanger I added. Installation: See my spring/shock install page. |
Bilstein HD shocks, a nice upgrade from the stock part, which will have trouble with the Eibach springs. In spring 2002, I had these shocks re-valved according to Sam Strano's specifications, and will continue to use them with the ProKit. They do feel nicer on the track. Installation: See my spring/shock install page. |
 |
When I'm drag racing with the ET Streets, the fenders can hit these larger tires. In addition, my car (as well as lots of other folks, it seems) sits lower on the right side by about 1/4", all the time. I made a set of spacers out of UHMW plastic (very dense plastic, the same material they make cutting boards from) that I use on the top of the existing rear spring donuts to raise the car up about an inch. One is thicker than the other, so it levels the car as well. So I pull these in and out each time I drag race,. and leave the smaller one it all the time to level the car. Installation: See my spring/shock install page.
|
 |
"Internet Alignment" I had the car aligned to Camber: -0.8°, Caster: +4.0°, Toe: 0", as recommended by the f-body FAQ for a lowered car. I've been getting some wear on the outside of the front tires with this alignment, so I just had it realigned to Camber: -1.4°, Caster: +3.6°, Toe: 0"
Camber is the angle of the wheel
relative to vertical when viewed from the front
Caster is the angle of the steering axis relative to
vertical when viewed from the side of the car
Toe is the alignment of the wheels when viewed from the top
The Tire Rack has a good description of alignment variables.
Between the suspension and chassis mods, they've made the car handle like a dream on the road course, though it's quite noisy and rough on the street. I've autocrossed this car a few times, and while I'm certainly a novice there, it seems pretty good (of course the car's in SM class...).
For interesting reading on suspension and handling, I recommend Performance Handling, by Don Alexander, and Chassis Engineering, by Herb Adams.
|
Copyright © 1997-2004 David Mills, no part of this site (http://www.go-fast.org/) may be reproduced without permission of the author. The author makes no claims or guarantees as to the quality of the information on this site. I'm an enthusiast just like you, and while everything here is correct as I know it, I'm not responsible if your car breaks. |