 |
 |
 |
 |
 |
 |
 |
 |
 |
 |
 |
 |
 |
 |
Shock/Spring Install
Changing out your springs and shocks is one of the best modifications you can do for handling on a road course, or even just to lower the car for that nice look. The front install isn't fun, so you only want to do this once if possible. Do the research and decide on both your spring and shock upgrade once, based on whether you're looking for just a "lowered" look on the street, or a serious track car.
Installation - Front
The fronts are though, the rears are easy. I don't have pictures of the rear install here, but I'll describe it below. Do the fronts first, then you'll be happy when you do the rears :) By the way, the install I describe here is one which doesn't separate the ball joint that connects the upper A-arm and the spindle. Some folks prefer to separate the ball joint, I haven't done it that way so I can't tell you which is easier.
 Lift
the front wheels off the ground, and set the jack stands under the frame
so the wheels can be moved up and down. Remove the front wheels, and
disconnect the swaybar end links and ABS connector. Set something under
the control arm so that as it drops down (it can fall to the floor once
the shock is out) it doesn't rip your brake line out of the caliper.
Lift
the front wheels off the ground, and set the jack stands under the frame
so the wheels can be moved up and down. Remove the front wheels, and
disconnect the swaybar end links and ABS connector. Set something under
the control arm so that as it drops down (it can fall to the floor once
the shock is out) it doesn't rip your brake line out of the caliper.
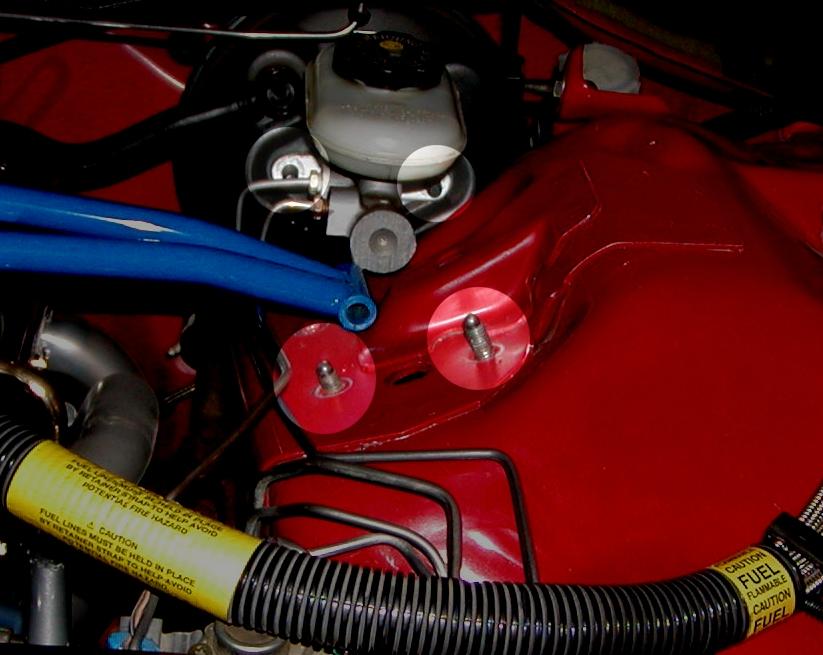
The shock assembly is held at the top by four bolts (accessed from the engine bay), and at the bottom by two bolts into the control arm. You want to remove all six. On the passenger's side, this is obvious. On the driver's side, the two rearward bolts are Torx bolts, and are located directly underneath the brake reservoir. You'll need to loosen the brake reservoir from the booster (two upper highlighted circles in the picture at left) so that you can get at these two torx bolts. Just pull the reservoir away gently, to avoid bending the brake lines. No fluid will leak out. Once you have all six bolts/nuts removed, you're ready to pull the shock assembly out.
 |
 |
Start by levering the lower end of the shock forward toward the caliper. You'll either break or cut off the plastic clip that holts the ABS wire in place (you won't be able to replace this clip, but I hear GM part number 12040984 is a great substitute). The shock should lever forward pretty easily with a large screwdriver. Once the base of the shock is pulled out toward the caliper, you can pull the top of the assembly outward in the wheel well.
Pull
the top of the shock assembly outward into the wheel well, while allowing
the control arm to drop as low as possible (keep an eye on that brake
line!). It should swing freely, and you'll suddenly end up with quite a
bit of weight in your lap (you're sitting with this whole assembly facing
you). Make sure you have some stuff sitting around to prop up the control
arm, so you don't end up sitting under your car waiting for your wife to
come home...). Once the top is out, it should be simple to extract the
shock assembly from the upper A-arm. and pull the bottom of the shock out
rearward, under the brake line.
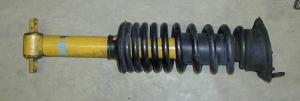 Once
you've removed both shock assemblies, you should have two of these.
Depending on whether you're just swapping springs, or replacing both
springs and shocks, you may need to compress these springs and swap the
shocks, or simply install your new springs on new shocks. Either
way, you can rent a spring compressor and do it yourself, or (my way) take
the assemblies down to your local Midas or other shop that does spring
installs, and ask them to do it for you. It can be a bit dangerous, and I
just had them do it for me. Make sure you take a look at how the rubber
isolator at the top is situated relative to the bracket at the base of the
shock, it needs to be in the same place when they mount up the new springs
& shocks.
Once
you've removed both shock assemblies, you should have two of these.
Depending on whether you're just swapping springs, or replacing both
springs and shocks, you may need to compress these springs and swap the
shocks, or simply install your new springs on new shocks. Either
way, you can rent a spring compressor and do it yourself, or (my way) take
the assemblies down to your local Midas or other shop that does spring
installs, and ask them to do it for you. It can be a bit dangerous, and I
just had them do it for me. Make sure you take a look at how the rubber
isolator at the top is situated relative to the bracket at the base of the
shock, it needs to be in the same place when they mount up the new springs
& shocks.
Now for the reinstall
I don't have more pictures, it's the same deal but in reverse:
First, dollop a glob of grease over the nut at the top of the shock. You may have noticed the old one was rusted, and might even have needed to be cut off. You'd rather not do this the next time.
Then, heft the assembly up such that it's situated in the A-arm holes, and the lower end of the shock is positioned on the control arm but toward the caliper as when you removed it.
Here's the hardest part for me. You need to get the top of the assembly pushed through the two holes into the fender. This can take a fair bit of pushing and shoving, maybe using your jack under the control arm, etc. Keep in mind that this should fit in without undue hammering, you just need to get all the angles right.
Once the top is in place, leverage the bottom of the shock inward to its correct position, using that big screwdriver again.
Tighten down all the bolts, reattach your end links, and connect the ABS connector back up (and zip-tire that wire to the control arm). You're done with the fronts.
Installation - Rear
As I mentioned, I don't have pics of this. But if you just did the fronts, this should be a piece of cake.
Raise the car body on jacks, so the rear wheels can hang down, and lift the rear up with a floor jack under the differential. Remove the nuts holding the bottom of the shocks, and let them hang loose. Also, remove both rear swaybar end links. At this point if you carefully lower the floor jack, the axle will drop very low - low enough that the springs can simply be pulled out. Don't lower any farther than is necessary, you don't want to rip your brake line at the top of the differential cover. Then, locate the upper shock mounting points. They're underneath the interior carpet, which should have some serrated cuts which you may need to open up if your shocks have never been removed. On the coupes, they're accessible from the hatchback, and in the convertibles they're behind the rear seatback. Just eyeball where they should be, you'll find them. Remove the nut off the top of each shock, and then pull the shock out from below.
Reverse the process to reassemble. The springs should be installed such that the lower cut end points forward, as it sits on the perch.
Conclusions
As I mentioned, this is probably the most significant change you can do for handling on your car. Well worth your trouble, it's just that the install isn't fun, so try to do it only once.
|
Copyright © 1997-2004 David Mills, no part of this site (http://www.go-fast.org/) may be reproduced without permission of the author. The author makes no claims or guarantees as to the quality of the information on this site. I'm an enthusiast just like you, and while everything here is correct as I know it, I'm not responsible if your car breaks. |