 |
 |
 |
 |
 |
 |
 |
 |
 |
 |
 |
 |
 |
 |
![]()
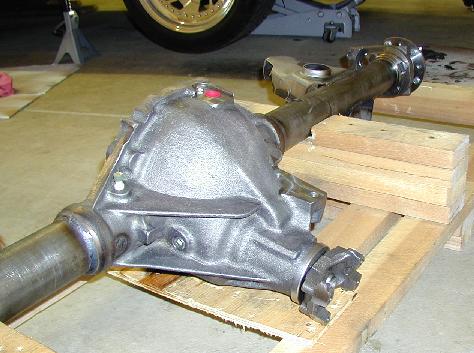
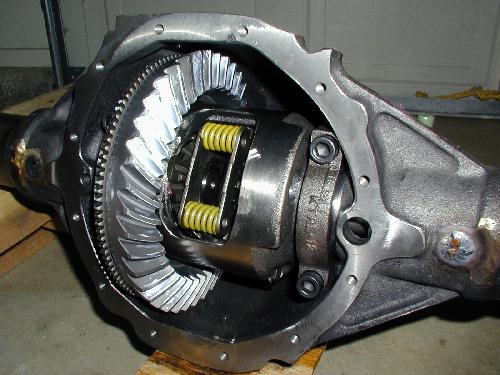
KTRE 12-bolt rear, installed just after the nitrous :-). Of course, this replaced the Motive gears and Torsen differential below, but I've left them there for those that might want the information. The 12-bolt comes equipped with Eaton posi, 33 spline Moser axles, chromoly axle tubes, Strange 3.73 gears, and supports ABS. KTRE builds most of the parts themselves, and this is a beautiful unit. It essentially is a direct bolt-in, after you get a new u-joint for your driveshaft. Unfortunately, I can't recommend that anyone buy this unit. KTRE has screwed over several folks on the f-body list, by charging their credit cards and never delivering the product. This has gone on for well over six months, with no end in sight, and folks are potentially going to loose serious money to this clown.
 |
 |
") |
Installation: See the install page for complete notes.
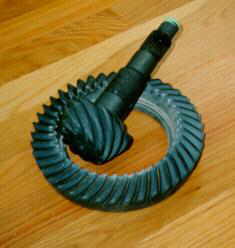 "Genuine GM" Motive ring & pinion gears, 4.10:1 ratio, part
26014589-10-41-GM-7 5/8. This is the new Motive part number for the Genuine GM gear. The
old part number G875410 has now been assigned to the standard Motive gear.
"Genuine GM" Motive ring & pinion gears, 4.10:1 ratio, part
26014589-10-41-GM-7 5/8. This is the new Motive part number for the Genuine GM gear. The
old part number G875410 has now been assigned to the standard Motive gear.
These gears replaced my stock 3.42:1 gears. I had them installed at Ring & Pinion Service, in Rancho Cordova, CA. They have a good reputation, which is key to getting gears not to whine.
I don't use these gears anymore, now that I have 3.73:1 Strange gears in my 12-bolt. But these gears live on - I sold the 10-bolt and it's still running and racing well. But I miss the 4.10 gears around town. They're a blast, and I'd put them back on in a minute if it weren't for the nitrous.
Notes: To break them in, I drove short trips (less than 15 miles), at under 50 mph and really took it easy on the differential. No hard starts, etc, for about 100 miles. After that, I drove for about 200 more miles, at any speed, still taking it easy on the gears. After about 350 miles, I changed the oil. I've got no noise from these gears.
This gear has worked out really well at the track. In 4th gear, I'm going through the traps at 111mph, at about 6000rpm. I can rev the car up to about 6500, so I've got some elbow room there. The 3.73 gear would get me through the traps at a much lower rpm, which wouldn't be a good thing. 450HP is really the limit for using 4.10's, though, and my first gear shift happens pretty fast.
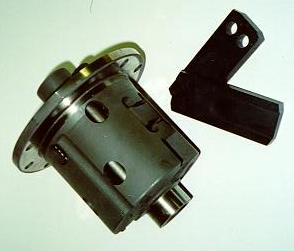 I installed a Torsen differential, after SLP had a good sale on them. At the
left, you see the differential unit, as well as the "paddle kit" that's required
to install 4.10:1 gears with it. This differential worked well for road and
drag racing, though I sold it when I installed the 12-bolt.
I installed a Torsen differential, after SLP had a good sale on them. At the
left, you see the differential unit, as well as the "paddle kit" that's required
to install 4.10:1 gears with it. This differential worked well for road and
drag racing, though I sold it when I installed the 12-bolt.

Early in 2001, I had a new driveshaft made by Denny’s Driveshafts. As usual, I had to compromise between an absolutely strong shaft (great strength for drag racing, but heavy) versus road racing (still strong, but lighter). I opted for the 3-1/2" light metal matrix composite aluminum shaft, which should be able to easily handle the power I'll give to it with the car, but still be relatively light, at 12 lbs or so. It's a 0.115" wall thickness, instead of the usual 0.125 thickness used on solid 6061T6 aluminum driveshafts. I had it built using a billet 27-spline T56 trans yoke (the LPE yoke's splines were twisting).
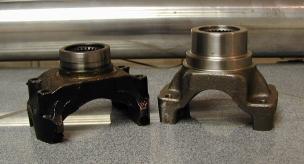 I also swapped the pinion yoke to a
Spicer 12-bolt yoke which will accept a 1350 u-joint (the standard yoke in
the KTRE is 1310). The Spicer yoke is on the right, the stock KTRE yoke is
on the left here.
I also swapped the pinion yoke to a
Spicer 12-bolt yoke which will accept a 1350 u-joint (the standard yoke in
the KTRE is 1310). The Spicer yoke is on the right, the stock KTRE yoke is
on the left here.
For quite a while, I used the Lingenfelter 3½" high speed balanced aluminum driveshaft, part LN0350. This driveshaft weighs 12lbs, reducing rotating mass by 5lbs. The stock driveshaft is 2½" diameter steel, and is known to have balance problems (see below), though mine didn't. This LPE shaft was really a great part, but when I banged it up enough, I decided to get a new custom one from Denny's.
Installation: Installation took about an hour, on jack stands in the garage. Since the new driveshaft is an inch larger, it is a bit difficult to install. Undo the four bolts holding the rear straps around the u-joint. Slide the shaft forward into the tranny a bit, then swing it down away from the rear end. Then pull it out from the tranny. To install the new one, lube the inside splines on the tranny end with a bit of tranny oil, and slide it in slowly. You get the point. Use a bit of locktite on the four bolts into the pinion yoke at the rear.
Many of the 4th generation f-bodies have a nasty problem with unbalanced driveshafts. The stock steel shaft has a tendency, if not balanced, to start a heavy vibration at about 90 miles per hour. I haven't had this vibration, but apparently it's very noticeable. There is a Technical Service Bulletin #67-41-01 of March 1996, that provides the fix for this driveshaft - essentially replacing it with the aluminum driveshaft from the 3rd generation 1LE model. If you actually have this vibration, I recommend taking a printout of this TSB to your dealer to clarify the situation. The dealer should evaluate the car, and hopefully make the replacement. Unfortunately, lots of folks have been using this TSB in an attempt to get a free performance driveshaft, when they don't have the vibration problem, though, and GM has been making it very difficult to get the replacement, as a result
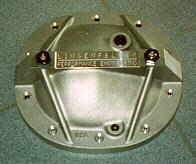 Lingenfelter differential cover and
stud kit, part TAP-75. Changing the gear oil becomes a bit easier, as this cover has a
drain hole. Use a ¼" allen wrench to remove it, and about 1½ quarts of oil will
drain out easily. Refill via the stock fill hole on the front right side of the
differential, as the fill hole in this cover is pretty hard to get at. The stock plug
comes out with a 3/8" socket wrench (with no socket, just the square drive). Fill
with 4 oz. GM limited slip additive (part 1052358) and about 1½ quarts of Mobil1 75/90
gear oil. You'll need a plastic tube siphon gizmoTM (got mine from Chief Auto,
along with the oil) as you can't pour from below the hole.
Lingenfelter differential cover and
stud kit, part TAP-75. Changing the gear oil becomes a bit easier, as this cover has a
drain hole. Use a ¼" allen wrench to remove it, and about 1½ quarts of oil will
drain out easily. Refill via the stock fill hole on the front right side of the
differential, as the fill hole in this cover is pretty hard to get at. The stock plug
comes out with a 3/8" socket wrench (with no socket, just the square drive). Fill
with 4 oz. GM limited slip additive (part 1052358) and about 1½ quarts of Mobil1 75/90
gear oil. You'll need a plastic tube siphon gizmoTM (got mine from Chief Auto,
along with the oil) as you can't pour from below the hole.
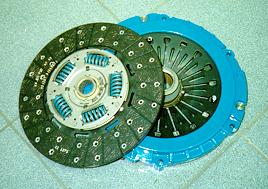 |
RPS Turbo Clutch, purchased from Performance SS. After the LPE 383 install, I noticed my clutch slipping at high rpm's. That's pretty reasonable, because the stock clutch is not rated to handle 450hp. The RPS unit is, though. It's a re-worked Valeo clutch (as most aftermarket units are), and is supposed to handle the horsepower. I also had the flywheel resurfaced. This clutch handled the 450hp of the LPE 383 just fine, through some 80-100 trips down the dragstrip, launching at 4500rpm. I was very pleased with it, until I added nitrous. Then it died on the first trip out... McLeod Street Twin, the next clutch I'm trying, since the RPS clutch couldn't handle the 600 crank horsepower and huge torque peak the car's generating with nitrous. I've run the clutch at the drag and road races now, and it's holding up very well. It shuddered more when it was new, and has calmed down a bit after ~1000 miles. |
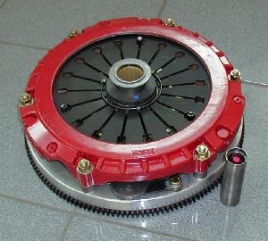 |
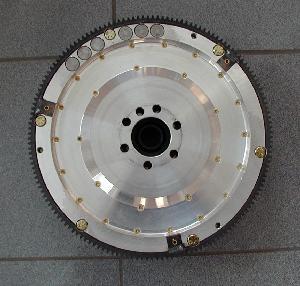 Here's the aluminum flywheel used with the McLeod clutch. The whole
package weighs around 36lbs, approximately the same as the stock setup with
cast flywheel. McLeod also sells a steel flywheel, which is probably more appropriate for a
dedicated drag car.
Here's the aluminum flywheel used with the McLeod clutch. The whole
package weighs around 36lbs, approximately the same as the stock setup with
cast flywheel. McLeod also sells a steel flywheel, which is probably more appropriate for a
dedicated drag car.
The installation was quite the nightmare. Not because there was any issue with putting it in, but because it turns out the flywheel was incorrectly balanced. The engine would start a nasty vibration at about 4500rpm and up. So I had the whole thing pulled out, and the flywheel balanced at a local shop. They had to remove 25 grams from one side of the flywheel to balance it, way more than should be acceptable from such a part. McLeod paid for the complete cost of removing, balancing, and reinstalling the flywheel - now there's customer service!
Note the trick here: you need to know whether your motor is balanced externally (all stock LT1's are neutral on the front damper, but externally balanced against the flywheel) or internally (most "built" motors are). If the motor is internally balanced, you should have the McLeod flywheel balanced neutrally - this is what machinists are most used to doing, and what they'd do if you just asked them to "balance this flywheel." If, on the other hand, your motor is externally balanced, that means your stock flywheel is not neutrally balanced. It has weights or holes drilled to compensate for the balance of your crank. In this case, you need to take your stock flywheel to the machinist as well, and have him "match" the balance of the stock flywheel onto the McLeod - adding or removing weight in the same areas as the stock flywheel.
I highly recommend you have this flywheel balanced. I've heard of quite a few folks that have had to pull it out after their motors didn't balance. While you're at it, have the pressure plate neutrally balanced as well. The cost of this balancing shouldn't be more than $50.
A couple other notes on the installation. The instructions will say to remove 0.050" from the clutch pivot fork, and you'll need to do this. Also, my started screeched quite a bit when engaged, and I shimmed it away from the flywheel with two thin (~1/16") washers under the bolts. You can also use a correct starter shim from an auto parts shop..
 B&M Ripper Shifter to shorten and firm up the feel of the shift.
Installing a shifter is not complicated, but you do need to pull out the center console, which is kind of a pain. Fortunately, the shifter comes with good instructions, and if you follow them, you'll have your console out pretty easily. Installation is pretty simple; remove the four bolts holding the stock shifter, then clean off any gasket sealer. Apply new gasket (not included), and bolt the new shifter down. The stops then need to be adjusted such that the shifter just hits them when you do a forceful shift. The instructions leave a fair gap between the shifter and the stop, but I moved the stop closer to the shifter still, using a piece of paper to measure just the slightest gap.
For the picture at the left, I actually installed the shifter without removing the console (that mess 'o nitrous wiring makes it a bit harder to remove my console!), but trust me, remove the console if at all possible.
Removed the Computer Assisted Gear Selection (CAGS) feature on the manual transmission. This is the function that forces you to shift from 1st to 4th gear, under certain circumstances. The feature is on the car to allow GM to claim better gas mileage on the cars. It's pretty annoying, and simple to disable.
Installation: This process appears to be slightly different on the various years. For the '97, this is what I did:
Removed the white wire (pin 15) on the blue connector in the PCM. This disables the "shift now, you idiot" light on the dash
Added a CAGS disconnect I bought from Mid America. This part was made for a Corvette, and I had to grind out the connector a bit to get it to fit. I'd actually recommend getting the JET Skip Shift Eliminator from Internet Racer's Supply.
This process works flawlessly. I have no skip-shift, no
SES light, and no "shift" light on the dash.
For technical information on a car that's had serious modification to the whole drivetrain, engine, clutch, M6 tranny, driveshaft, rear end, take a look though LJ's site.
|
Copyright © 1997-2004 David Mills, no part of this site (http://www.go-fast.org/) may be reproduced without permission of the author. The author makes no claims or guarantees as to the quality of the information on this site. I'm an enthusiast just like you, and while everything here is correct as I know it, I'm not responsible if your car breaks. |