 |
 |
 |
 |
 |
 |
 |
 |
 |
 |
 |
 |
 |
 |
![]()

I had the paint done locally, and I'm pretty happy with it. I had a guy ask me if the car was a Ferrari the other day! Actually, I should keep a list of these events. Included so far are: Ferrari, Viper, and Lamborghini. To be fair, the last was from a little kid, who asked his mom "is that a Lamborghini?" I admit they do look like Ferrari intake ducts, but I like the subtle look they give. Hopefully they'll be viewed as the Homage à Ferrari that I intended. I'll wait for the 383 before I get flames painted on!
I drew these in Photo Paint, by scanning a picture of the car in, then drawing various ideas on the car. It's a nice way to tell what it will look like. The painter suggested flat black, without clearcoat. The idea was they'd match the other black areas of the car (headlight openings, etc), which are flat. I think it was a good idea. Please don't ask me for measurements or specifications on the stripes. They're unique to my car, and I'd rather not have everyone driving around with the same ones.
Brent Franker maintains a site of appearance mods, including wheels, stripes, etc, if you're looking for ideas.
 After
a fair bit of racing, I decided it would be fun to have a camera in the
car, so I could watch (at a more leisurely pace) what was going on, as
well as show my family. This is the IO Port Camera
Mount, which is a
pretty common one. It needs a solid place (like your rollbar) to mount to,
and provides adjustability in all three dimensions. It's a great setup!
After
a fair bit of racing, I decided it would be fun to have a camera in the
car, so I could watch (at a more leisurely pace) what was going on, as
well as show my family. This is the IO Port Camera
Mount, which is a
pretty common one. It needs a solid place (like your rollbar) to mount to,
and provides adjustability in all three dimensions. It's a great setup!
 Here's my alternator with a Mallory billet aluminum fan, and a March billet pulley and pulley cover.
These are dress-up parts, and look pretty cool (IMO).
Here's my alternator with a Mallory billet aluminum fan, and a March billet pulley and pulley cover.
These are dress-up parts, and look pretty cool (IMO).
Installation: Installing the fan is a bitch, specifically removing the stock alternator nut! It takes a 15/16" ratchet, and unscrews in normal fashion, counter-clockwise. You need two people. Give your friend the biggest pair of pliers you've got, and have him stand on the passenger side of the car (use a fender cover) and pinch the stock fan with the pliers (not the plastic fan blades, but the flat part with the metal). Have him rest the pliers on something solid such that when you start pulling on the socket, he gets some help with leverage, because you'll be able to out-pull him with the socket. I also sprayed WD-40 all over the nut, though I don't know if that helped any or not.
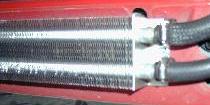 I
added this power steering cooler, since our power steering pumps have
a tendency to burn up during road racing. I used Perma-Cool
#PRM-1005, from Summit Racing, but there are a variety of coolers
available
I
added this power steering cooler, since our power steering pumps have
a tendency to burn up during road racing. I used Perma-Cool
#PRM-1005, from Summit Racing, but there are a variety of coolers
available
Installation: See the Install Page.

In this shot of the engine bay, you can see my Rytek Projektz Tuning billet fan shroud and throttle linkage cover.
Installation: Piece of cake to install, just a few screws. I added a couple nylon washers under the fan shroud, to make the surface level.

Car Cover from Classic Industries. I've used these for a while, and they are very nice. Made by Kimberly Clark, of a material called Technalon 4.
Installation: Put the
cover on the top of the car, pull the sides down :-). There is actually a note that comes
with the car that states not to use it while driving. No kidding...

Valentine-1 Radar Detector, probably the best on the market. One nice feature is that it gives you the direction of the radar it sees.
March crank pulley, part 4050. This pulley is simple to install (you'll need a new serpentine belt: Gates #K060598 or Dayco #5060595 or Goodyear #4060592), and claims to add 10HP. It appears to give quite a bit less in Real LifeTM, but it's cheap... I removed this pulley when I installed the Fluidampr harmonic damper.
Installation: The pulley is actually installed behind the stock crank pulley, so you remove the stock one (3 bolts), slide the new pulley on, followed by the stock pulley. Then use the supplied (longer) bolts to tighten the whole thing down. Very simple, though folks with older cars may have trouble getting the stock pulley off the crank. When you install the new belt, make sure it's on right, I learned the hard way.
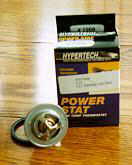
Hypertech 160° Thermostat, part HYP1008. This helps keep the engine cool.
Installation: Installation involves draining some coolant, then removing the water pump intake to get to the the thermostat. No big deal here, but keep your animals away during this one - coolant is deadly if drunk. When you torque back down the bolts in the water pump, do not user the 14fl-lbs as listed in the Helm manual - this is a typo, and is far too tight. Just make them snug. Remember to bleed the air out of the system from the two brass screws once you put the coolant back in. You have two brass screws on the coolant line that goes in to the top of the pump (where you installed the thermo). Stuff a few rags beneath this line, to catch the overflow, and loosen these screws up a bit. Start the engine. As the engine warms up, the coolant should force the air out, and eventually you'll have coolant bubbling out the bleeder screws. Check the radiator level and add water if it drops below the top. Close each one off when coolant's coming out.
Watch out for the alternator and serpentine belt spinning around while you're doing this...
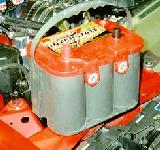 I had to
replace my stock battery after it died several times. The red-top Optima seems to be the
battery of choice, and thus far, it's held up nicely.
I had to
replace my stock battery after it died several times. The red-top Optima seems to be the
battery of choice, and thus far, it's held up nicely.
 |
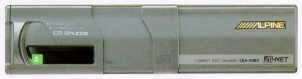 |
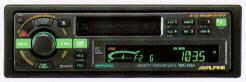
Alpine Stereo, TDA 7554 radio/cassette head unit; CHA S604 6-disk CD changer.
For those of you who had your dealer drill holes in the front fascia to install the license plate frame, I just found a good solution (assuming you want to plug the holes). At the Pep Boys bolt and nut section, I found a black plastic plug sold by a company called Motormite (a large "M" logo). These plugs are called "Splash Shield Retainers" part 45522, for GM, Ford and Chrysler.
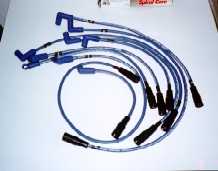
Moroso Blue Max spark plug wires, part 72526
 NGK TR55 Spark Plugs,
gapped to stock 0.050"
NGK TR55 Spark Plugs,
gapped to stock 0.050"
Of course, you need a cool plate...

|
Copyright © 1997-2004 David Mills, no part of this site (http://www.go-fast.org/) may be reproduced without permission of the author. The author makes no claims or guarantees as to the quality of the information on this site. I'm an enthusiast just like you, and while everything here is correct as I know it, I'm not responsible if your car breaks. |