 |
 |
 |
 |
 |
 |
 |
 |
 |
 |
 |
 |
 |
 |
![]()
A torque arm in an interesting beast, and I can't really say that I'd encourage everyone to upgrade the stock one. But if you do, there are several things to be aware of that might guide you as to why and what to look for:
-
Adjustability: For drag racing, it's generally considered helpful to set your pinion angle between -2° and -4°. Most of the good torque arms are adjustable, and there's no reason to buy an aftermarket torque arm that's not adjustable unless you don't plan on drag racing.
-
Front mount point: You'd like to remove the front mounting point from the transmission, and to place it where the g-load brace is, or to tie it laterally to your subframe connectors. This way, the torque arm can push upwards against the body/frame of the car, rather than the tranny.
-
Front mount mechanism: The torque arm needs to be able to have free fore/aft movement at the front mount point, as that's the main direction it shifts during acceleration. It also needs to be able to twist, as it's connected to the rear axle, and as the axle rotates (say, over a bump), the torque arm will twist as well.
-
Driveshaft Loop: If you're doing any racing, or run your car at high speeds regularly, you probably want a driveshaft loop, which typically mounts right where the torque arm mounts, so make sure you've got both figured out before you buy.
-
Strength: Final reason of course is the strength of the aftermarket units versus the stock unit. The stock one provides the needed twist by actually flexing the torque arm itself. Thus it's a fairly weak piece, and when asked to push up on the car (drag racing launch, powering out of a turn) the arm itself bends a bit. All the aftermarket arms are quite strong, and as long as they allow twist via another mechanism, they have no need to flex.
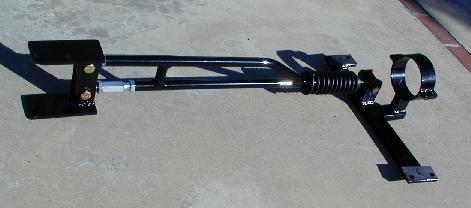
Please note that Spohn has changed the front slider/bushing setup recently, so this particular torque arm is a bit different from what you'd get. The install won't be any different, but you might want to verify that the new one meets your requirements. That said, on with the install!

Background
So this is my third torque arm, and I'm hoping to save you at least one of the purchases with the information here. The first one I bought was the LG arm, which turned out to be a mistake. Along the left side of this page, you'll see a mildly confusing picture. What I've done is to stack, from the rear forward, the LG arm, then the stock arm, then the Spohn arm. All are oriented with their mounting points aligned, and with the "top" to the right of the picture. If you look at the bottom of the picture, I've marked the total height of each arm. You'll note that the LG arm is a fair bit taller than the stock arm. This results in it banging along your transmission tunnel, if you've lowered your car (at least it did with mine - I've had quite a few comments from folks that say there's was fine). This contact got worse when I installed the 12-bolt, which pushed the rear mount point even closer to the tranny tunnel. That's one of the reasons I got rid of this arm.
Since I've got the 12-bolt rear end, so my install was slightly different from stock, and I'll try to note the differences.
Installation
First thing you do, pull off the torque arm you've got. If it's the stock one, there will be two long bolts that connect the rear, straight through the differential case. At the front is the rubber mount in the transmission. You can just loosen the top bolt then slide the arm out. The whole bracket on the transmission can be removed if you want, the Spohn arm won't use it. Also, remove the g-load cross brace and set it, and its bolts, aside. You won't use them. There's no need to remove your driveshaft - the Spohn arm comes with the driveshaft loop in two pieces that screw together, so you can put it around the driveshaft after everything's in.
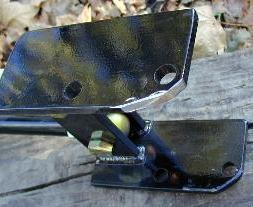 |
Having been here before with the LG arm, I was prepared for a slight bit of grinding necessary at the rear of the TA mount brackets. Sure enough, it's needed. I suspect it wouldn't be necessary at all on a stock 10-bolt, but you can see the corner I cut off, on the top plate here (which is actually the one that sits at the bottom of the pumpkin. The bottom plate here was already trimmed, but I still needed to nick off just a touch of the corner. |
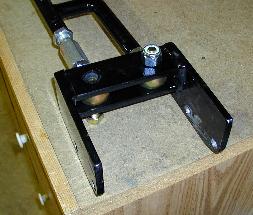 |
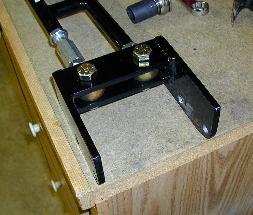
Here's a note to keep in mind. There are two bolts that extend through the rod ends, that allow the adjustability. Stock, they come as in the picture at the left, with the nuts on the side that will point to the driver's side of the car (one of the nuts is removed already in the pic). When you install the arm this way, in a lowered car, these nuts will collide with the body of the car, right at the rear seat. The solution is to remove and reverse the bolts, as shown in the picture below. The thinner depth of the bolt heads is enough to clear the body. |
 |
 |
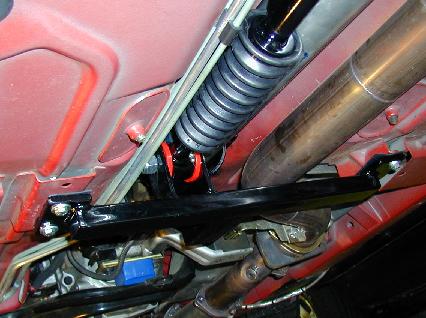 |
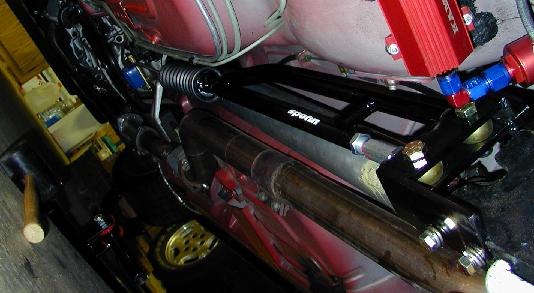
Okay, we're ready to install. This is pretty easy, since the torque arm comes in two pieces. Slide the rear half over the rear end and line up the bolt holes. If you're using the two long stock bolts to attach the torque arm, first remove the thick washers on them (the bolts aren't long enough to fit over the sturdy brackets if the washers are there). Don't tighten the bolts down, just get it on so that it won't come loose.
Now the front. Apply some grease to both sides of the sliding mechanism, and slide them together. Align the cross-brace with the existing holes, and use the supplied bolts and washers to attach the cross-brace to the same points the stock one came from. Tighten these bolts down, and the ones holding the rear. Use the supplied zip-tie around the front of the shock boot, to cover up the slider and keep dust out. Grease the two zerk fittings well, while you're here.
Grab the top half of the driveshaft loop, work it around the driveshaft such that the two cut-off corners align, and bolt it down.
That's it, the arm is installed!
Adjusting the Pinion Angle
Once installed, you need to adjust the pinion angle on the torque arm. See my Pinion Angle Adjustment page for instructions.
Conclusions
This Spohn torque arm is a beautiful piece of work, I was really impressed. The install is pretty simple, and would have been even simpler had I been putting it on the stock rear end. To be fair, it still hits on the transmission tunnel next to the driver's side rear seat. It's a lot less area, though, and I can deal with it. It seems to drive basically the same as the LG arm.
|
Copyright © 1997-2004 David Mills, no part of this site (http://www.go-fast.org/) may be reproduced without permission of the author. The author makes no claims or guarantees as to the quality of the information on this site. I'm an enthusiast just like you, and while everything here is correct as I know it, I'm not responsible if your car breaks. |