 |
 |
 |
 |
 |
 |
 |
 |
 |
 |
 |
 |
 |
 |

Maintenance of your engine and drivetrain is critical. I've listed some maintenance items here, with brief instructions on how to perform them yourself. Of course, you can also have your dealer do them, but why not just do it yourself! You'll learn more about your car in the process.
Jacking the Car Up
Lots of maintenance and installation requires jacking the car up. To do this safely, you should have a good quality floor jack, at least two jack stands, a set of ramps, and a pair of wheel chocks. You can get all these at your local Sears or WalMart, or shop for higher quality ones (I use a jack which is pretty low profile, to get under the lowered car). Depending on what part of the car needs to be off the ground, then:
Front only, weight on wheels: Drive up on the ramps, set parking brake.
Front only, suspension extended: Drive up on ramps to get the front in the air. Place floor jack under lower control arm on one side, leaving room for a jack stand next to it. Or place floor jack under subframe connector, or jack point behind one front wheel. Lift corner off ramp, and place jack stand under control arm. Repeat for other side. I usually leave the ramps positioned under the front wheels, as a safety measure.
Rear only, weight on wheels (suspension compressed): Back up on the ramps, set parking brake, put chock under front wheel. Alternatively, jack from under the differential case, and set jack stands under the axle, one at each wheel.
Rear only, suspension extended: Jack from under the differential case, and set jack stands at the stock rear jack point just in front of the rear wheels (on the plastic pads). Let jack down slowly allowing axle to fall to whatever position you need. Place jack stands under subframe connectors instead, if you have them.
If you have trouble with the nose hitting your ramps as you drive on, you might get a couple 2x4's to drive up on, to raise the nose a bit before it hits the ramp.
Engine Oil
When you get your new car, you'll want to stick to a good schedule of oil changes. Change the oil and filter the first time at about 500 miles, then every 3000 miles thereafter. You want to get out any metal fragments that wear early on. I'm using Mobil 1 5W-30 Synthetic. Also, you can use a filter comparable to the AC PF35-L filter (see warning below), instead of the stock PF25. This filter size is larger, and filters particles down to 12 microns, not just the 30 microns of the PF25. If you have an oil cooler, this filter may hang too low, so be careful. Note that the new 1998 f-bodies use a different filter, the PF44. All the filters I list here for the 1993-7 LT1 cars only. See http://minimopar.simplenet.com/oilfilterstudy.html for a great review of filters.
Warning! As of 12/22/97, the Bay Area F-Body group determined that many PF35-L filters being sold appear to be very different from the earlier PF35-L filters we all used as an upgrade to the PF25. This filter is the same general size as the old PF35-L, so you might not notice on first glance. As it turns out, Delco switched manufacturers for the filter, and it isn't the same quality it used to be, so it isn't recommended anymore. Check the details of this issue here... In the meantime, you may want to use another filter, such as the Mobil 1 M1-301 (PF35-sized), PureONE PL34631 or FRAM HP4 (high flow for race use, not good for a street car), all 12 micron filters, or the Wix Sport Performance #5060 a 5 micron filter.
Change the oil when the motor is warm, to allow it to drain out more easily. Jack the front up, climb under the car, and pull the drain plug from the oil pan (the LT1 has a 15mm bolt) being prepared to catch the oil in something. If you have the car tilted forward and to the driver's side, you should get more out. Once most of the oil is out, loosen and remove the filter. I seem to have the best luck using the classic metal strap wrench that goes around the filter. Clean off the seal for the filter on the block. Fill the new filter with new oil, and wipe a bead of oil along the gasket on the filter, before you thread it on. Don't tighten the new filter down too tight, or you may never get it off. Only turn it about one turn more from the point it first touches the block, and only tighten by hand. Once the oil's all drained out (I let it drain for about an hour), replace the plug (I use a new gasket and a magnetic drain plug in 1/2"-20 size but that's not critical) and drop the car down to level ground (so your dipstick reading is accurate). Pour in about 5 quarts of oil, until the dipstick shows the correct level. Start the engine up, and re-verify the fill level.
If you don't want to change the engine oil yourself, here's a tip. When you take the car in to your dealer, bring along a filter and a 6-pack of Mobil 1 oil. They should use it for you, rather than their brand. This not only gets the oil in there that you want, but you can buy it at a good price.
Rear Axle Oil
You'll want to change the rear axle oil at 6,000 miles, to get out any metal particles. I'm using Torco gear oil, and GM Limited Slip Additive (part 1052358, available at your GM dealer). The Limited Slip Additive is probably not necessary with synthetic oils, but will quiet down the gears. Note that this gear oil really stinks, and you should probably wear gloves or some sort of full-body rubber suit!
Jack the car up, but keep it as level as possible, since you fill it until it overflows. Pull the differential cover off, being careful to catch the oil as it gushes out. You may want to raise your oil pan up higher. Clean out the differential and cover well, before reassembling with a new gasket. The new oil is added from the fill plug, on the passenger front side of the differential. Remove the plug by using a 1/2" socket wrench (no socket, just the square drive). You'll need to add about 2 quarts of oil, and a 4oz bottle of Limited Slip Additive. Get one of the fill tubes, because you'll need to squeeze this oil in from below. Keep filling until the oil is at the level of the fill hole. You can also get a new differential cover with a drain plug in it, or have one installed in the stock cover, so that this process will be easier the next time around.
Transmission Fluid (manual)
About every 15,000 miles, you should replace your transmission fluid. I've replaced mine with Mobil 1 Synthetic ATF, and also RedLine D4 ATF. Some folks also use the Honda ATF Z1 with good results. I didn't notice a different "feel" between them; the key is to use a "Mercron III Compliant Automatic Transmission Fluid". For the M6 transmission, you'll need just over 4 quarts, so buy 5. I've never changed the fluid on an automatic tranny, and it's very different from this...
Jack the car up, but keep it as level as possible, since you fill it until it overflows. Pull the drain plug on the passenger's side of the transmission, and let the old oil drain out. Tilt the car to the passenger's side to let as much as possible drain. Then replace this plug, level the car, and fill from the plug in the driver's side, until the oil overflows the fill hole. You'll need to use a fill tube to squeeze the oil in.

Brakes
About every other year, but certainly more often if you road race, you'll want to completely flush and replace your brake fluid. To do this, you bleed as normal, but rather than simply bleeding out the air, you bleed each caliper until new fluid comes through. This is easy to see, as the old fluid will be dark colored, whereas the new fluid is clear. Make sure to regularly check and re-fill the reservoir, so you don't suck air into the lines. Do them in the same order as you bleed.
Bleeding Brakes
Brake bleeding is a particularly obnoxious process, for me. I don't know why I dread it, because it's really not that hard. But I hate it. So here you go, maybe you'll see something wrong with my process and show me the light :)
Firstly, you'll need: a 1/4" diameter, 2' long plastic tube that slips over the bleed screw on the caliper, a 10mm wrench to open the bleed screw, something to allow fluid to pour into, like an empty Coke can; and some fresh brake fluid (Ford dealers carry a good DOT 3 fluid, ATE Super Blue is good, and for racing Motul is probably best) to refill the reservoir. You also need a friend to sit in the car and pump the brakes (yes, there are many devices available to help if you don't have a friend, but I do, so I don't use them). You'll bleed in the following order: ABS (rear), ABS (front), right rear, left rear, right front, left front, ABS (front). On the ABS unit, the bleeder on the passenger side is for the rear modulator, the one you should bleed first. The one on the driver side is for the front brakes.
Make sure the ABS light isn't on from the last time you drove the car. If it is, start (and maybe drive) the car until the light goes out. If the light is on, and you bleed the brakes, you'll need to go to a dealer and have him reset the ABS with a Tech II.
So here we go. Take the cap off the reservoir. Starting with the ABS unit under the hood, then one caliper at a time, attach the hose to the bleed screw, with the other end in the Coke can. Open the screw, call out "DOWN" and have your friend push down (and hold) the brake pedal. Fluid should come out, and hopefully go into the can (which is probably laying sideways on the ground, spilling a mixture of Coke and brake fluid). Tighten the screw, and call out "UP", and your friend lets up on the brake pedal, sucking some fluid in from the reservoir. Continue this DOWN/UP sequence as long as you see any bubbles in the fluid. Check the reservoir periodically, to make sure it isn't too low (you don't want it to run dry and suck air into the lines). Cycle to the next caliper, noting that for the fronts, it's probably easier to take the wheels off to do this. When the bleeding is complete, top off the reservoir, and you're done.
Brake Rotors
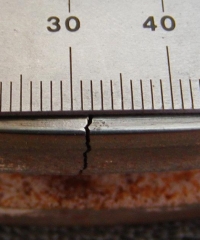 Okay,
not quite the usual maintenance item, but they do wear, and especially if
you use your car on a road course or autocross, it's likely you'll be
replacing your front rotors periodically. Typical problems will be warping
(usually from unbalanced heat/cooling, so be careful to accurately torque
your wheel lugs, not set your parking brake when rotors are hot and run
cool-down lap) which will be evidenced by vibration when braking, and
cracking, which is also from heat stress. While minor surface cracks tend
to show up and are probably okay to live with, a crack through the whole
rotor certainly is not safe.
Okay,
not quite the usual maintenance item, but they do wear, and especially if
you use your car on a road course or autocross, it's likely you'll be
replacing your front rotors periodically. Typical problems will be warping
(usually from unbalanced heat/cooling, so be careful to accurately torque
your wheel lugs, not set your parking brake when rotors are hot and run
cool-down lap) which will be evidenced by vibration when braking, and
cracking, which is also from heat stress. While minor surface cracks tend
to show up and are probably okay to live with, a crack through the whole
rotor certainly is not safe.
"Blank" rotors (no holes, no slots) are going to be just as effective as any other style. I use slotted rotors sometimes because I like the look, and I have them zinc coated so they stay silver colored rather than looking rusty. But the slots and coating are just for looks. If you're tracking the car, don't get drilled rotors as they not only remove material that you'd like to have for heat transfer, but they're more likely to crack.
To
replace the rotors, simply unbolt the two bolts on the rear of the caliper
(the stock fronts will require an allen socket), pull the caliper aside,
then swap the rotors. Torque the bolts back down to 72ft-lbs, and you're
done. Season the rotors if they're new.
Brake Pads
Haven't written this yet.
Suspension
Since I've replaced a lot of my suspension bushings with Energy Suspension polyurethane parts, they have a tendency to squeak. Lube them about every 6000 miles, or whenever they start to squeak.
Get a small grease gun, the kind you can hold and squeeze with one hand. Grease any zerk fitting you can find under the car, making sure to wipe the fittings clean before greasing, or you'll force in the dirt and gunk.
Even though the owner's manual states to lube the suspension, steering and shift linkage, you can't do this on the '96+ cars, as these are now sealed.
Tires
Make sure you keep your tires inflated, to around 35psi (when cold), and check them often. You'd be surprised how they lose air. Especially with seasonal changes, the pressure in your tires can change dramatically. Tires should also be rotated, every 6000 miles, as long as they're not directional.
Underbody Paint
Lots of folks are surprised the first time they look under their car and find the rear end all rusty. I don't know exactly why they are, but all the cars seem to ship with rusty rear axle and differential. Fortunately, there's a pretty easy fix, and a great product for it. It's called POR-15, for Paint Over Rust. This product is made by RestoMotive Laboratories (800) 457-6715, and really works. Just brush the area down with a wire brush, and paint. It makes a very hard surface, and looks like it should have in the first place. The paint comes in black or silver, a pint is probably enough to cover the rear end.
Cooling System
") Red
Line Water Wetter keeps the
coolant temperature lower, and works by lowering the surface tension of the liquid. You
need to lower the percentage of coolant in the mix, so drain a gallon from the radiator,
add the bottle of Water Wetter, then fill with distilled water. If the car
doesn't see freezing temperatures, you can run pure distilled water and
Water Wetter, with no coolant at all. Make sure to bleed the system of air
when you're done. I didn't notice anything particular after I added the product, but
plenty of other folks have noticed improvement.
Red
Line Water Wetter keeps the
coolant temperature lower, and works by lowering the surface tension of the liquid. You
need to lower the percentage of coolant in the mix, so drain a gallon from the radiator,
add the bottle of Water Wetter, then fill with distilled water. If the car
doesn't see freezing temperatures, you can run pure distilled water and
Water Wetter, with no coolant at all. Make sure to bleed the system of air
when you're done. I didn't notice anything particular after I added the product, but
plenty of other folks have noticed improvement.
GM claims the cooling system is good for 150,00 miles, but plenty of folks have had trouble with the Dexcool coolant, and I recommend you change it far more often than that.
Ignition
Plugs and wires are claimed to last 100,000 miles, if you believe GM. More likely, you should change them every 50,000. I'm using NGK plugs and Accell Extreme 9000 plug wires
Air Filter
The air filter should be changed (or cleaned, in the case of K&N) every 30,000 miles.
Fuel Filter
The fuel filter sits along the driver's side underbody of the car, just beneath the back seat. It should be changed every year or so, an easy enough task. You'll need a replacement filter (from GM or any parts store), and a couple wrenches to do the swap. Let the car stand for several hours to relieve fuel pressure, but even still, as you loosen the old filter, be prepared for some fuel to come out of the lines. One end of the filter unclips (by hand), while the other will require the wrenches.
Polish
")
I just started using this polish, rather than wax, on the car. It's called Zaino Bros. Show Car Polish. Here's my first application experience: Washed the car (paint is still like new) with Dawn to clean it off pretty good first. I have flat black stripes painted on it, and have been having trouble with the wax building up on them, giving me that ugly white look. The Dawn cleaned most off, but the stripes were still a bit grayish.
The undercoat of pre-cleaner, and the first coat of polish went on
Saturday, and frankly, I was a bit worried. The car looked fine, but not particularly
better than with wax. The stripes looked fantastic - absolutely black, and still a bit
flat (which is what I wanted). Sunday, I added a second coat of polish, and that did it.
Something just clicked, and the car just shines. Absolutely glossy and smooth! Tuesday, I
added coat #3, which was the icing on the cake. It really looks good. Shiny, slippery,
wet, the works!
I'm also doing my wife's 5 year old black BMW, and her paint is much
more ... worn. It's really looking nice too. I think this is a better test, since the
paint was really tired looking before, and it's shining up very well.
This stuff is nice, and certainly easier to apply than wax. I have to
order more - you really need a few bottles of the polish - looks like one bottle will get
you about 6-7 applications.
Rod Ends
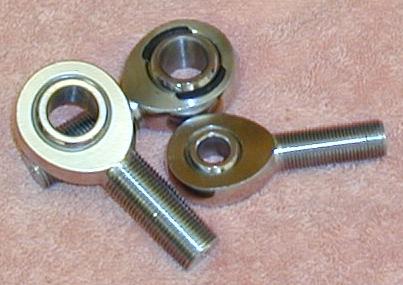 Not
required on a car with stock suspension, but if you add any rod ends to
your LCA's, Panhard rod, or other components, they become a wear item and
need periodic replacement. You'll know because they start rattling like
crazy as the bearing becomes loose. I buy mine from Racer
Parts Wholesale, QA1 also sells
quality ends. Get the best you possibly can.
Not
required on a car with stock suspension, but if you add any rod ends to
your LCA's, Panhard rod, or other components, they become a wear item and
need periodic replacement. You'll know because they start rattling like
crazy as the bearing becomes loose. I buy mine from Racer
Parts Wholesale, QA1 also sells
quality ends. Get the best you possibly can.
Different Intervals
I've listed above the standard maintenance intervals for what GM calls "short trip/city driving." For cars that are mostly used on the freeway, these intervals can be extended. For cars that are raced, the intervals should be shortened. For example, I change my engine oil and bleed my brakes after every road racing event, and flush the brake fluid every other event.
|
Copyright © 1997-2004 David Mills, no part of this site (http://www.go-fast.org/) may be reproduced without permission of the author. The author makes no claims or guarantees as to the quality of the information on this site. I'm an enthusiast just like you, and while everything here is correct as I know it, I'm not responsible if your car breaks. |