 |
 |
 |
 |
 |
 |
 |
 |
 |
 |
 |
 |
 |
 |
![]()
After waiting forever to get the KTRE 12-bolt, I was anxious to put it in. It's not a particularly complicated install, just a bit un-nerving at points. Unfortunately, I didn't take detailed step-by-step notes, so this is a summary from memory. But the whole thing's pretty obvious, so I don't think I've given any bogus instructions here. If you see any mistakes in this write-up, though, I'd appreciate a note.
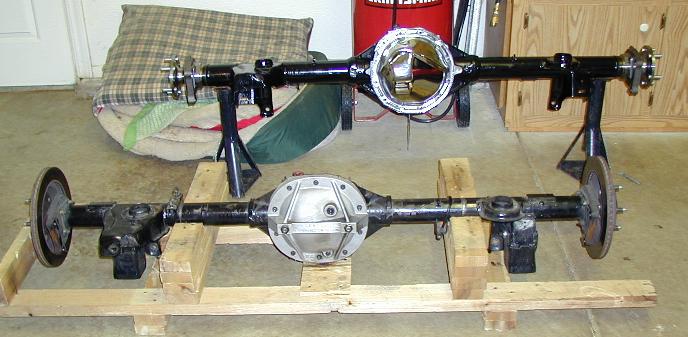
Above, you see the two axles, the stock one below (with TA cover and rotors on still), and the KTRE above, with it's shiny chrome cover. The KTRE's supposed to be a bolt-in, so let's get at it!
Note, I'm still not recommending you actually purchase the KTRE unit (see my concerns). The Strange 12-bolt is about the same unit, and is the one I'd recommend buying. These instructions should be identical for the Strange unit, but the Moser 12-bolt apparently takes a fair amount of custom work that's not described here. The various 9" rears also take some customization as well.
Parts
You'll need a fair assortment of jacking stuff. The car needs to be on four jack stands by the frame, fairly high, and then you need your floor jack available to lift the axle in and out. A third pair of jack stands will probably come in handy as well.
Prep
 Before
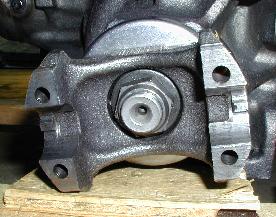
you pull anything apart, make sure the driveshaft you'll be using actually
mates to the new rear end. KTRE, for example, doesn't use the stock
u-joint size on the yoke. It's easy for a driveshaft shop to press in a
new u-joint to your driveshaft, but you'd hate to have the car all ripped
apart before you figured this one out.
Before
you pull anything apart, make sure the driveshaft you'll be using actually
mates to the new rear end. KTRE, for example, doesn't use the stock
u-joint size on the yoke. It's easy for a driveshaft shop to press in a
new u-joint to your driveshaft, but you'd hate to have the car all ripped
apart before you figured this one out.
Once you've got that resolved, you're ready
to get going. Raise the car up on stands at all four corners. At the rear,
you want jack stands under the frame, so that you can manipulate the rear
end up and down separately. Lower the rear end down, almost to full
travel.
Disassembly
Here's where I may miss a part or two, but it should be obvious when you're under the car. You just want to pull off everything that's hooked to that old axle.
-
Wheels - remove them, and set them under the rotors. This way, you can reduce any potential damage of the axle falling off the jack
-
Driveshaft - pull the four bolts at the rear of the shaft, slide it forward a bit into the tranny, then swing it down and back out
-
Sway bar - disconnect end links, and remove the bushing brackets and pull the swaybar out
-
Shocks - disconnect the bottom bolt and swing the shock out of the bracket. Rotate the shock a quarter turn so it's out of the way. After the shocks are out, lower the rear more, until...
-
Springs will drop out
-
Abs speed sensor - unclip the electrical connection at the top of the pumpkin
-
Brake lines - Unbolt the single bolt from the left side of the pumpkin, that holds the brake lines down, and loosen the lines from the clips along the axle
-
Calipers - Remove the two bolts holding each caliper to the axle, and slide them off the rotors. Hang them so they aren't suspended by brake lines
-
Panhard rod - pull both bolts out and remove it
-
Control arms - you can probably just remove the rear bolts, and let them hang from the front
-
Torque arm - remove the two long bolts holding it to the nose of the pumpkin, and also unhook it from the front mount point on the transmission. When you remove the torque arm, be prepared for the axle's weight to shift on the jack, because the TA keeps it in position. You don't want it to fall off the jack.
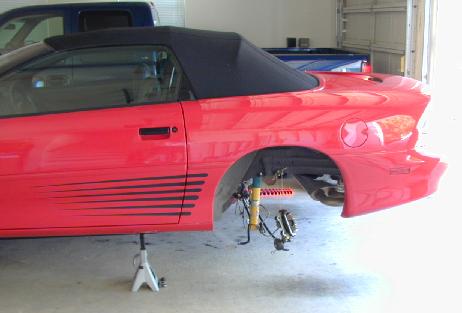
I think that's it. I listed them in that order for pretty good reasons, so you might just want to follow that order. You probably want a helper for the last part there while you're pulling the torque arm. Then carefully wheel it out of the way. Your car should look something like this!
Pull the rotors off your stock axle, by removing the small lock washers that are on one or more of the studs. Just use a needle-nose pliers, and rip them off. You won't need to replace these on the new axle, so don't worry about trashing them.
Assembly
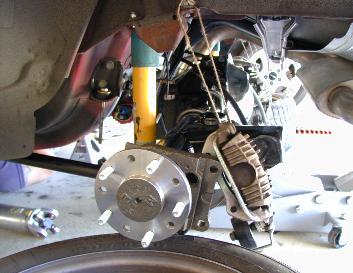 Again,
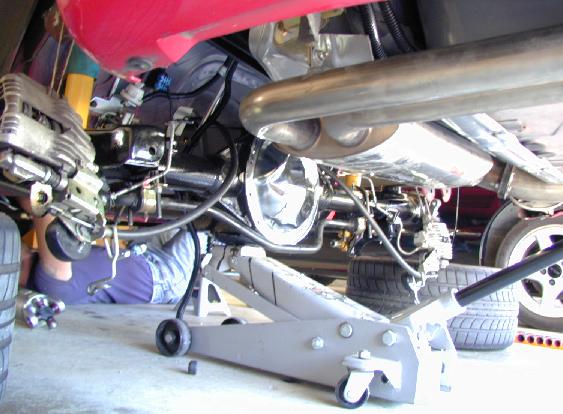
no magic here. Above is a picture while we're partway through. Roll the
new axle generally into position, and start bolting things on. The
toughest alignment issue you'll have is getting the lower control arms and
torque arm bolted in, because they really position the axle. So start with
those, while you can still move the axle around. You'll probably want a
friend to help again, because you'll be hefting the axle up and down,
rotating it, etc, until things line up. Then re-connect all the stuff we
removed above, following the list in reverse order. Hang the rotors on
there before you put the calipers on, of course.
Again,
no magic here. Above is a picture while we're partway through. Roll the
new axle generally into position, and start bolting things on. The
toughest alignment issue you'll have is getting the lower control arms and
torque arm bolted in, because they really position the axle. So start with
those, while you can still move the axle around. You'll probably want a
friend to help again, because you'll be hefting the axle up and down,
rotating it, etc, until things line up. Then re-connect all the stuff we
removed above, following the list in reverse order. Hang the rotors on
there before you put the calipers on, of course.
As you put in the springs, make sure the
rubber pads are seated correctly at the top. and the bottoms should be
turned such that the cut end of the spring is pointing to the front of the
car. After they go in, raise the rear to the point that the shocks line up
to the brackets and slip in.
Remember, the new rear end probably doesn't have oil in it. So get it
filled up before you drive off!
Custom Work
The only hitch on the KTRE was fitting the torque arm to the rear end. I have the LG torque arm, and the mounting point on the KTRE is slightly different from the stock rear (since it's a wider rear). I had to grind a couple pieces off the torque arm to make it fit onto the new rear. I suppose each torque arm may have a slightly different attachment setup, and may need a bit of re-work. Figure this out before you get the new rear in place under the car.
Conclusions
It's a simple install, really. Certainly don't pay someone to do this. The only hitch I've had is this torque arm thing. First, I had to grind it to attach (not KTRE's fault, just the size of the case is bigger), but the torque arm does mount in a position which is to the left of where it originally mounted. On bumps, my torque arm does hit the inside left of the transmission tunnel, right at the back.
|
Copyright © 1997-2004 David Mills, no part of this site (http://www.go-fast.org/) may be reproduced without permission of the author. The author makes no claims or guarantees as to the quality of the information on this site. I'm an enthusiast just like you, and while everything here is correct as I know it, I'm not responsible if your car breaks. |